How to convert a drawing or a logo into a vector (SVG)
A photo of your logo is made of pixels: enlarge it and it looks blurry, and a cutting machine or a design program does not know what to do with it. A vector stores outlines instead of pixels, so it scales without losing sharpness and can be edited point by point. This guide converts a drawing into a vector with Galion Photo and exports it as an SVG.
What you need
- An image with good contrast: dark ink on light paper, or the other way round. A phone photo works if it is well lit and free of shadows.
- At least about 1000 pixels wide. With less, the edges come out ragged.
- A single-colour drawing. Auto-trace separates ink from background; it is not meant for photos with gradients.
Step by step
- Open galiontoon.com, choose Galion Photo and open your image with File → Open….
- Go to Image → Auto-trace image…. It opens with the active layer as the source and a cyan preview on the canvas.
- Adjust the Threshold until the preview follows the ink well. If your drawing is light on a dark background, tick Invert. Smoothing reduces the number of nodes and Minimum detail discards small specks.
- Under Path mode, choose All components: it traces every piece of the logo and also its holes, such as the inside of an O or a ring. Largest component only traces the main silhouette.
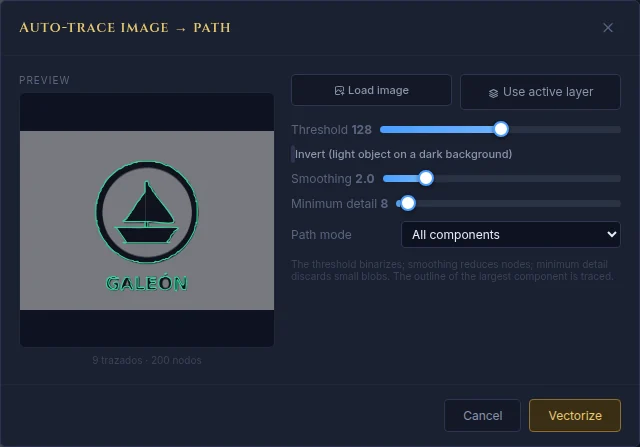
Image → Auto-trace image…: threshold, smoothing, minimum detail and path mode. - Click Vectorize. A path appears for each piece and each hole.
- Use Layer → Text and shapes → Shape from all paths: all the pieces are joined into a single shape layer, with the holes left empty. It takes the main colour; you can change it later.
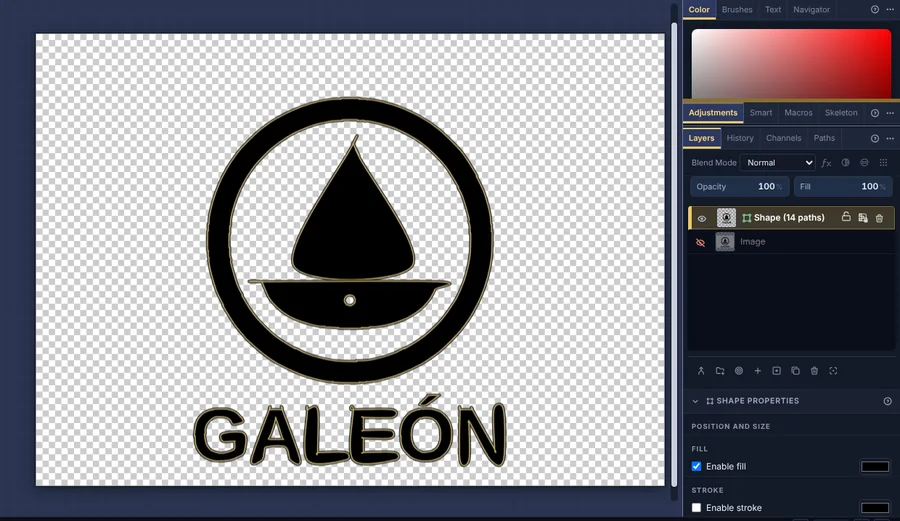
A single shape layer with every piece of the logo and the holes left empty. - Hide the photo layer with its eye in the Layers panel and export with File → Export As... → Vector SVG → Export....
What you get
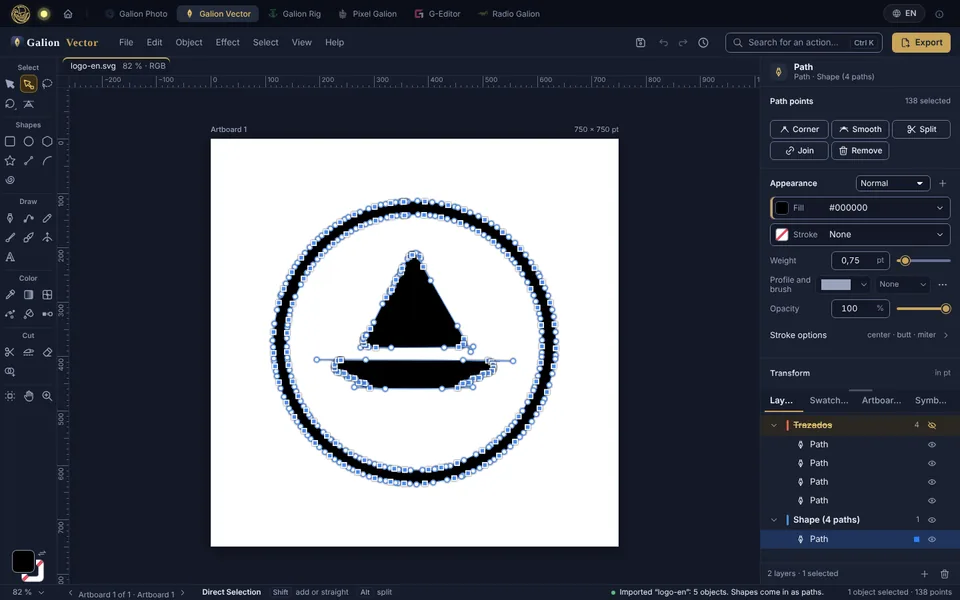
An SVG file in which your logo is a real path, not an image placed inside. It scales to any size without losing sharpness, opens in any vector editor so you can edit its nodes, and is accepted by the cutting and engraving machines that work with SVG. Text in the document also comes out as vectors.
The original paths are also included in a hidden layer called “Trazados”, in case you want to touch them up separately in another program. Anything that is not vector, such as a photo that is still visible, is stored as an image inside the SVG; that is why it is worth hiding it before exporting.
Tips for a good result
- Photograph the drawing straight on and with even light: shadows turn into blotches.
- Before tracing, paint over any specks or smudges you do not want with white.
- For lettering and geometric shapes, low smoothing; for organic shapes, a little higher.
- If you want to add a name to the logo, type it with the Text tool and a catalog font: it also comes out as a vector. The guide Free fonts for commercial designs explains which ones you can use.
Common problems
- Lots of small specks appear as paths. Raise the Minimum detail or clean the image before tracing.
- Letters with holes, such as O or A, come out solid. Use All components and create the shape with Shape from all paths, not “from last path”, which only takes one.
- Corners come out rounded or distorted. Lower the Smoothing and vectorize again.
- The SVG still contains an image. A visible layer was not vector, usually the source photo. Hide it before exporting. A shape with layer styles, a mask or a special blend mode is also stored as an image so that its look does not change.
- Only the outer silhouette comes out. Largest component was selected. Switch to All components.
Common questions
What is the difference between a PNG and a vector SVG? A PNG stores pixels and has a fixed size. A vector SVG stores outlines: it looks sharp at any size and can be edited point by point.
Does it work for a cutting or engraving machine? Yes, as long as it accepts SVG, which is the norm. The shape comes out with closed outlines, which is what those machines need.
Can I touch up the result in GalionToon? Yes. Paths are edited with the Pen; if you change any, create the shape layer from all paths again.
Does it work with photographs? That is not what it is for. Auto-trace separates ink from background, so with an ordinary photo you would get blotches. To cut out a person or object, use the guide How to remove the background from a photo.
Is my drawing uploaded to a server? No. Tracing and exporting happen in your browser, and the file does not leave your device until you send it.
More guides
- How to make your first manga page in your browser6 min read
- How to make a vertical webtoon to read on a phone5 min read
- Speech balloons and speed lines for your comic5 min read
- Comic and manga page sizes: B5, A4, comic book and webtoon5 min read
- How to import your custom brushes4 min read
- How to remove the background from a photo in your browser5 min read
- How to open and save a PSD file in your browser4 min read
- How to make your first animated pixel art3 min read
- How to add subtitles to a video in your browser3 min read
- How to edit your first video in your browser4 min read
- How to make a YouTube thumbnail for free in your browser4 min read
- How to crop a photo into a circle for your profile picture4 min read
- How to put text on a photo so it can be read4 min read
- Layer masks: what they are and how to use them4 min read
- How to resize an image for social media without losing quality4 min read
- How to make an Instagram post step by step4 min read
- How to create a sprite sheet for a video game4 min read
- Free fonts for commercial designs: how to choose them5 min read
- How to animate a character with bones in Galion Rig4 min read