How to make an Instagram post step by step
A good Instagram post does not need an expensive design program: it needs the right size, a photo that fills the frame, text that reads on a phone and a little care with what Instagram crops. This guide does it from start to finish in Galion Photo, inside your browser.
Before you start: the format
- 1080 × 1350 (4:5, portrait) is the safest format: it takes up more screen than a square photo and it is the one in GalionToon’s template.
- 1080 × 1440 (3:4) is even taller; Instagram has accepted it since 2025 and it is the exact proportion of the profile thumbnails.
- 1080 × 1080 (1:1) still works, but on the profile it loses quite a lot on the sides.
- Since 2025, the profile grid shows a 3:4 portrait crop of each post. On a 1080 × 1350 image that removes a narrow strip on each side: keep faces, logos and text away from the side edges.
Step by step
- Open galiontoon.com and choose Galion Photo. If you prefer to be guided, open Guided tasks on the home screen and choose Create an Instagram post: it points out where to tap at each step.
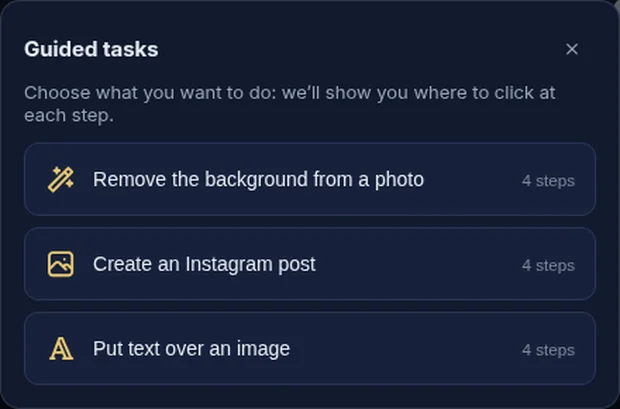
On the home screen, Guided tasks takes you step by step to the 1080 × 1350 canvas. - Go to File → New…, Social media tab, choose Instagram · portrait post (1080 × 1350) and click Create.
- Add your photo with File → Place image as layer… and enlarge it with the handles until it covers the whole canvas. If the photo does not have the right proportion, the guide How to resize an image for social media explains how to crop it first.
- If the text is going over a busy area, create a new layer and paint a dark band with the Gradient (G key) at the bottom: it adds contrast without covering the photo.
- Write the title with the Text tool (T key): few words, a heavy font and a large size. Below it, in another text layer, a smaller line and your username. The guide How to put text on a photo so it can be read has more techniques.
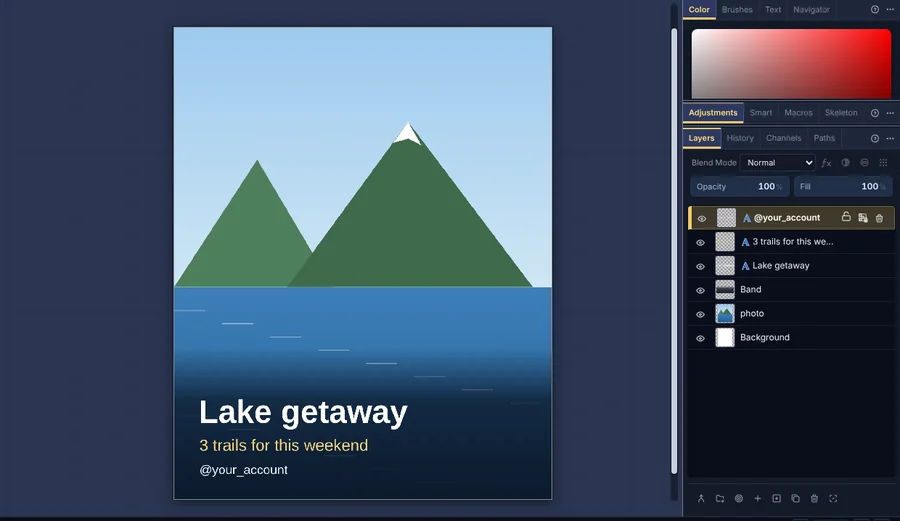
Example made with the template: photo, gradient band and three texts, each on its own layer. - Zoom out until the post is the size it would be on a phone and check that everything reads. Also check that nothing important is stuck to the sides.
- Export with File → Export As...: JPEG with a quality between 85 and 92. Also save the design with File → Save to reuse it for your next post.
How to upload it to Instagram
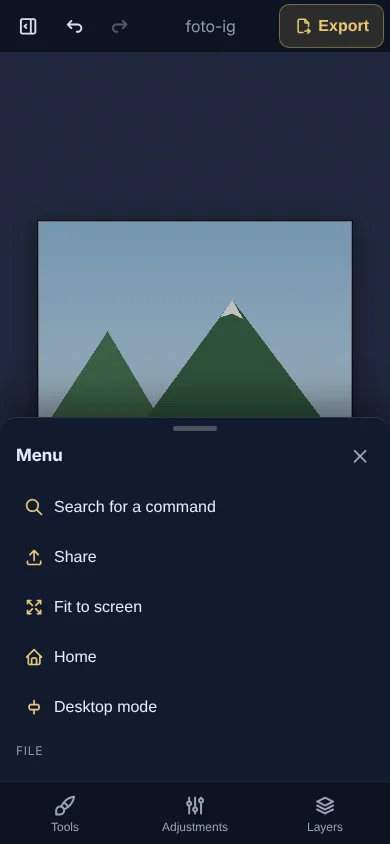
From your phone: if you made the design on your phone, open the Menu and tap Share. The system share menu opens and you can send it straight to Instagram. If your browser cannot share files, the image is downloaded and you upload it from your gallery.
From your computer: Instagram also lets you post from its website, with the create button. Upload the exported JPEG as it is, without cropping it again.
A carousel of several images
For a carousel, make each image in its own tab (the + button in the tab bar) with the same template, and export them in order. Instagram uses the first image’s proportion for all of them, so they should all be the same size. It accepts up to 20 images, although some accounts still have the old limit of 10.
Common problems
- On the profile, the text or a face gets cut off. That is the 3:4 crop of the grid. Move those elements away from the side edges or design at 1080 × 1440. Instagram also lets you adjust each post’s thumbnail from its options.
- It looks blurry once posted. The starting photo was small or you exported at a different size. Export at 1080 wide, as a high-quality JPEG.
- Colours look dull. Keep Embed color profile (sRGB) turned on in Export As: it is the colour space Instagram expects.
- The carousel images come out cropped. Not all of them had the same proportion as the first one. Make them all with the same template.
- Instagram does not appear when sharing on the phone. Your browser cannot share files. The image will have been downloaded: upload it from your gallery.
Common questions
Should I use 4:5 or 3:4? Both work. 4:5 (1080 × 1350) is the classic, safe option; 3:4 (1080 × 1440) takes up a little more screen and is not cropped on the profile. What matters is choosing one and keeping it across all your posts.
Does GalionToon post for me or schedule posts? No. GalionToon creates the image; you post it on Instagram, or schedule it with Meta’s tools.
Does Instagram reduce quality? It recompresses every image. Uploading it at 1080 wide and in good quality keeps that second step as unnoticeable as possible.
What about stories or Reels? Use the Story · Reel · TikTok template (1080 × 1920) and keep the top and bottom clear, where Instagram puts its own interface.
Is it free and private? Yes. GalionToon is free, needs no account and works inside your browser: your photos are not uploaded to any server.
More guides
- How to make your first manga page in your browser6 min read
- How to make a vertical webtoon to read on a phone5 min read
- Speech balloons and speed lines for your comic5 min read
- Comic and manga page sizes: B5, A4, comic book and webtoon5 min read
- How to import your custom brushes4 min read
- How to remove the background from a photo in your browser5 min read
- How to open and save a PSD file in your browser4 min read
- How to make your first animated pixel art3 min read
- How to add subtitles to a video in your browser3 min read
- How to edit your first video in your browser4 min read
- How to make a YouTube thumbnail for free in your browser4 min read
- How to crop a photo into a circle for your profile picture4 min read
- How to put text on a photo so it can be read4 min read
- Layer masks: what they are and how to use them4 min read
- How to resize an image for social media without losing quality4 min read
- How to create a sprite sheet for a video game4 min read
- Free fonts for commercial designs: how to choose them5 min read
- How to animate a character with bones in Galion Rig4 min read
- How to convert a drawing or a logo into a vector (SVG)4 min read