Layer masks: what they are and how to use them
Erasing part of an image is quick, but there is no way back: if you need that piece tomorrow, it is gone. A layer mask does the same thing without destroying anything: instead of deleting pixels, it decides which part of the layer is shown and which part is hidden. The image stays whole underneath, and you can change your mind whenever you like.
The idea in thirty seconds
- A mask is a black-and-white image attached to a layer.
- White shows: where the mask is white, the layer is visible.
- Black hides: where it is black, the layer disappears and you see whatever is below.
- Greys show it partly: that is why a black-to-white gradient blends one layer into another without a visible seam.
Step by step: blend two photos
- Open galiontoon.com, choose Galion Photo and open the bottom photo with File → Open….
- Add the second photo with File → Place image as layer…. It comes in as a new layer, on top of the first one.
- With the top layer selected, use Layer → Layer mask → Add mask (or the mask button in the Layers panel). A white thumbnail appears next to the layer’s, and the mask is selected: at the top you will see the Frame (mask) level.
- Choose the Gradient (G key) with black as the main colour and white as the secondary one; the X key swaps them. Drag from where you want the top photo to disappear to where it should be fully visible.
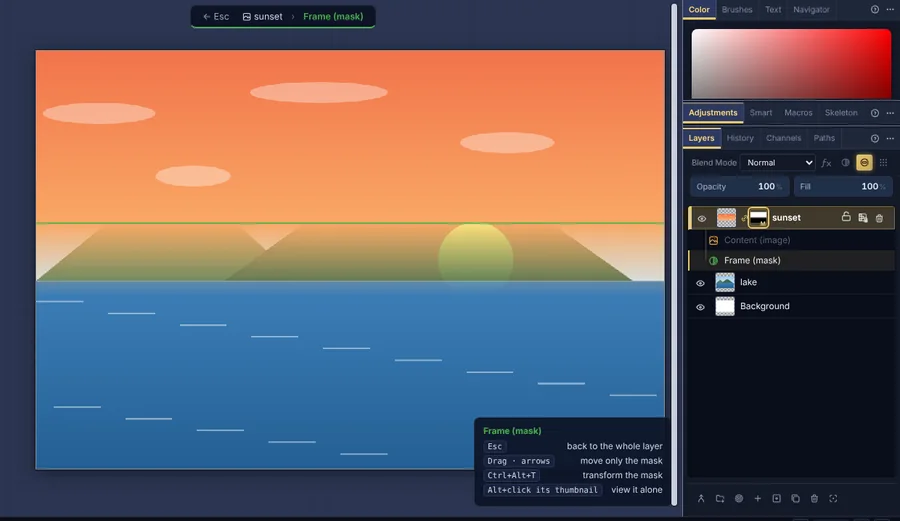
A black-to-white gradient in the mask blends the sky with the lake, without erasing anything. - Touch up with the Brush (B key): black to hide a little more, white to bring back. If you lower the brush opacity, you paint in-between tones.
- To see the mask on its own, Alt+click its thumbnail. Another Alt+click takes you back to the image.
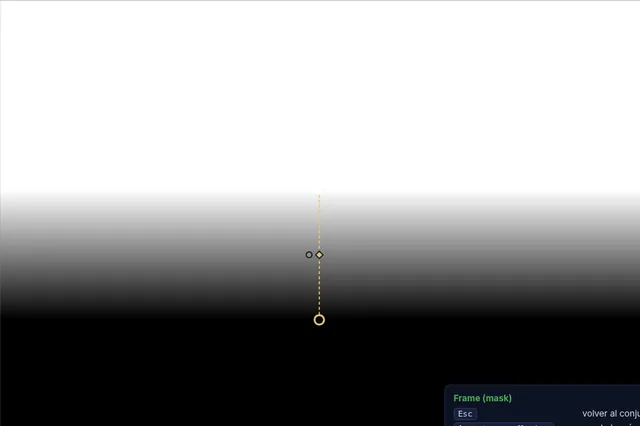
Alt+click the thumbnail: the mask alone. White shows, black hides, grey shows it partly. - Save with File → Save to keep the mask and touch it up tomorrow, or export the finished image.
Other ways to create a mask
- From a selection. Select an area with any selection tool and use Layer → Layer mask → Mask from selection: what is selected stays visible and the rest is hidden.
- With a shape. The Mask from shape tool (K key) creates the mask directly with a rectangle, an ellipse or a lasso. The guide How to crop a photo into a circle uses it step by step.
- Automatically. Remove background… separates the person or object and keeps the result as a mask, not as an erase. How to remove the background from a photo explains it.
What else you can do with a mask
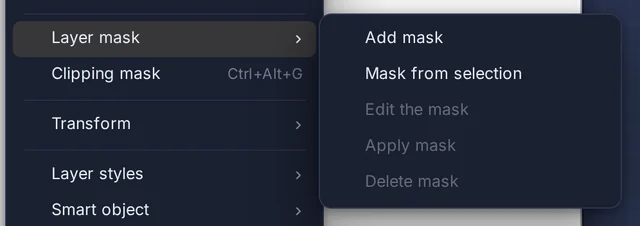
- Invert it, to show what was hidden and vice versa: right-click its thumbnail → Invert mask.
- Turn it off for a moment, to compare: right-click its thumbnail → Disable mask. Nothing is lost.
- Move only the mask: with the Frame (mask) level selected, drag it. Esc goes back to moving the whole layer.
- Apply it with Layer → Layer mask → Apply mask: what is hidden is really deleted. Use it only at the end, and preferably on a copy.
- Remove it with Layer → Layer mask → Delete mask: the whole layer is visible again.
Common problems
- I paint black and the photo gets black marks. You are painting on the image, not on the mask. Click the mask thumbnail (the top should read Frame (mask)) and paint again.
- The gradient creates a new layer called “Gradient fill”. No mask was selected. Undo with Ctrl+Z, select the mask and try again.
- I paint and nothing changes. You are painting white over an area that is already visible, or the mask is disabled. Check the colour and, with a right-click on its thumbnail, turn it back on.
- The edge of the hidden area looks hard. Lower the brush hardness or use the gradient. To soften the whole edge at once, open Remove background… and click Feather edge: it works on the mask you already have.
- When exporting, the hidden area turns white. If there is no other layer underneath, that area is transparent, and JPG does not support transparency. Export as PNG or add a background layer.
Common questions
What is the difference between erasing and using a mask? The Eraser removes pixels for good. The mask only hides them: you can bring them back at any time by painting white or deleting the mask.
Does the mask reduce image quality? No. The original image is not touched; the mask only decides which part is shown.
Is it kept when saving as PSD? Yes. File → Quick export → PSD saves it as a layer mask, and it can still be edited in GalionToon or in other editors.
What is a “clipping mask”? Something else: with Layer → Clipping mask, a layer only shows where the layer below has content. It is used, for example, to put a photo inside some text.
Does it work on a phone? Yes. On a phone, the mask button is in the Layers tab, and the Brush and the Gradient are in Tools. Tap the mask thumbnail before painting.
More guides
- How to make your first manga page in your browser6 min read
- How to make a vertical webtoon to read on a phone5 min read
- Speech balloons and speed lines for your comic5 min read
- Comic and manga page sizes: B5, A4, comic book and webtoon5 min read
- How to import your custom brushes4 min read
- How to remove the background from a photo in your browser5 min read
- How to open and save a PSD file in your browser4 min read
- How to make your first animated pixel art3 min read
- How to add subtitles to a video in your browser3 min read
- How to edit your first video in your browser4 min read
- How to make a YouTube thumbnail for free in your browser4 min read
- How to crop a photo into a circle for your profile picture4 min read
- How to put text on a photo so it can be read4 min read
- How to resize an image for social media without losing quality4 min read
- How to make an Instagram post step by step4 min read
- How to create a sprite sheet for a video game4 min read
- Free fonts for commercial designs: how to choose them5 min read
- How to animate a character with bones in Galion Rig4 min read
- How to convert a drawing or a logo into a vector (SVG)4 min read