How to remove the background from a photo or image for free
The short answer: open the image in Galion Photo, go to Image → Remove background…, pick a method and export as PNG. The background turns transparent in a few seconds, with no account and no watermark. Below you will find each step, which method suits which photo and how to fix the edges.
Removing a background used to mean installing a heavy program or uploading your photo to a website you know nothing about. In GalionToon you do it inside your browser, and the image never leaves your device: the engine that separates the subject runs on your own computer.
What you need
- A browser such as Chrome, Edge, Firefox or Safari, on a computer or a phone.
- The photo you want to cut out.
- The first time you use an automatic method, an internet connection to download the engine (about 10 MB) and its data. After that they are stored in your browser and the download does not repeat. The classic method needs no internet.
Step by step
- Open galiontoon.com and choose Galion Photo.
- Go to File → Open… and pick your photo. You can also drag the file onto the canvas.
- Go to Image → Remove background…. The panel “Remove background — choose method” opens, with a short cheat sheet on which method suits each case. If you have the action bar turned on, it is also there as “Remove background”.
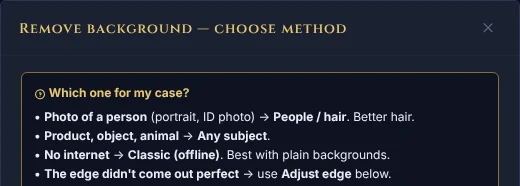
The “Remove background” window starts with a cheat sheet: which method suits each photo. - Choose the method. People / hair for portraits: it is the one that treats hair best. Any subject for products, objects and animals. Classic background removal if the background is a single flat colour or you have no internet: it is instant and leaves clean edges on logos and product shots.
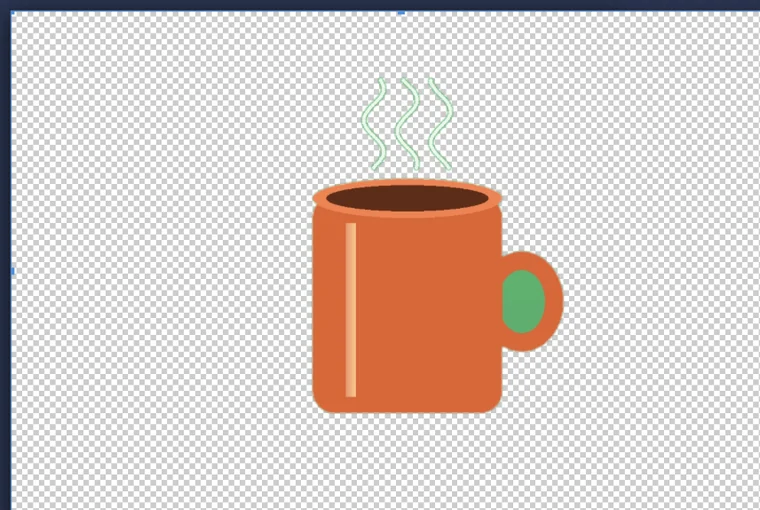
Illustration: selecting by colour (the same idea as the classic method). - Wait for the engine to load the first time. When it finishes, GalionToon adds a layer mask instead of erasing pixels, so nothing is lost and you can always go back.
Diagram: automatic cutout finds the subject and the background turns transparent. - If the edge is not perfect, open Remove background… again and use the Adjust edge buttons: Expand edge, Contract edge, Feather edge, Refine edge… and Decontaminate halo. They work on the mask you already have.
- Paint on the mask with a brush to bring back a piece that was removed by mistake, or to hide something the automatic cutout kept. Black hides, white brings back. The guide Layer masks: what they are and how to use them explains it in more detail.
Diagram: painting black on the mask hides, painting white brings it back. - Export with File → Quick export → PNG to keep transparency, or File → Quick export → PSD if you want to keep the layers and the mask for later (you can reopen it here or in other editors, as the guide How to open and save a PSD file in your browser explains).
Which method to use
Both automatic methods look for the main subject and work well with people, pets and objects photographed in a real scene. They take a few seconds and a bit of memory. People / hair is trained for portraits and handles hair better; Any subject recognises objects and animals. If you only want to pick out the subject without touching the background yet, use Select the subject only: it creates the selection without erasing anything.
The classic method removes pixels similar to the background colour, so it is unbeatable on a plain white or green background and works offline. It fails as soon as the subject contains that same colour. In its window you can adjust the Tolerance and see the result as a mask or as a cut-out before applying it.
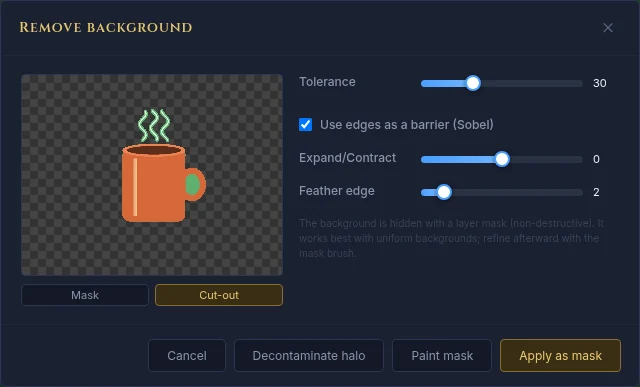
If none is perfect, combine them: run the automatic cutout first and then clean the leftovers by painting on the mask. That is usually faster than starting a manual selection from zero.
Tips for a clean cut
- Use the largest version of the photo you have. Small or heavily compressed images leave rough edges that no method can fix.
- Hair is where every cut-out shows its seams. Soften the mask edge slightly instead of trying to keep every strand sharp.
- If you are going to put the subject on a dark background, check the edge against dark grey first: light halos only become obvious there.
Common problems
- A light or dark halo stays around the subject. It is background colour stuck to the edge. Click Decontaminate halo: it cleans the colour of the edge without eating into the subject. If it still shows, use Contract edge once.
- An enclosed gap keeps the background, like the handle of a mug or the space between an arm and the body. With the classic method, the Use edges as a barrier box stops the removal from reaching areas surrounded by the subject. Untick it, or paint black on the mask over that gap.
- Part of the subject disappears because it has the same colour as the background. Paint it white on the mask, or try Any subject, which does not rely on colour alone.
- The edge looks jagged. Click Feather edge once or twice, or Refine edge… for finer control.
- The automatic cutout never finishes loading. The first time it needs internet. If your connection is fine, close other tabs to free memory and try again; meanwhile, the classic method works offline.
- The background turns white when you export. You saved a JPG, which has no transparency. Use File → Quick export → PNG or File → Quick export → PSD.
Common questions
Does my photo get uploaded anywhere? No. The photo stays in your browser. What travels over the internet is the cutout engine and its data, which are downloaded once from a public repository.
Is it really free? Yes. GalionToon is free and will stay free; later, a small amount of advertising will help keep it running. There is no account and no watermark.
Does it work without internet? After the first download, the cutout engine and its data are stored in your browser, so the automatic cut-out works even if you lose your connection. The classic method never needs internet.
Does it work on a phone? Yes. In the phone’s simple mode, “Remove background” is in the bottom bar. With very large photos it can take longer than on a computer, because the cutout runs on your phone.
Can I use the result commercially? The cut-out is yours. Check that you have the rights to the original photo, which is the part people forget.
How do I get a PNG with a transparent background? Export with File → Quick export → PNG. PNG keeps the transparency; JPG does not, and fills the background with white.
Can I put a different background behind it? Yes. Create a new layer under the photo and fill it with a colour, or bring in another image with File → Place image as layer… and move it down in the Layers panel. To make the subject fit in, match the light and colour as the guide How to edit a photo online for free explains.
More guides
- How to make your first manga page in your browser6 min read
- How to make a vertical webtoon to read on a phone5 min read
- Speech balloons and speed lines for your comic5 min read
- Comic and manga page sizes: B5, A4, comic book and webtoon5 min read
- How to import your custom brushes4 min read
- How to open and save a PSD file in your browser4 min read
- How to make your first animated pixel art3 min read
- How to add subtitles to a video in your browser3 min read
- How to edit your first video in your browser4 min read
- How to make a YouTube thumbnail for free in your browser4 min read
- How to crop a photo into a circle for your profile picture4 min read
- How to put text on a photo so it can be read4 min read
- Layer masks: what they are and how to use them4 min read
- How to resize an image for social media without losing quality4 min read
- How to make an Instagram post step by step4 min read
- How to create a sprite sheet for a video game4 min read
- Free fonts for commercial designs: how to choose them5 min read
- How to animate a character with bones in Galion Rig4 min read
- How to convert a drawing or a logo into a vector (SVG)4 min read