How to edit a photo online for free, without signing up
To edit a photo without installing anything or creating an account: open it in Galion Photo, crop and straighten it, fix the light with Levels and the colour with Hue / Saturation, and save it with File → Export As…. It takes a few minutes and there is no watermark.
This guide follows the order that works for almost any photo: framing first, then light, then colour, and finally small touch-ups and export.
What you need
- A current browser, on a computer or a tablet.
- The photo you want to edit. If it matters, work on a copy and keep the original somewhere safe.
Step by step
- Open galiontoon.com and go to Galion Photo.
- Go to File → Open… and choose your photo. You can also drag it onto the canvas.
- Crop with the Crop tool (C key): drag the frame until only what matters is left. If the horizon is tilted, use the Straighten option in its bar and draw a line along the horizon.
- Fix the light with Image → Adjustments → Levels… (Ctrl+L): bring the black and white triangles in to where the histogram starts. For something quick there is also Brightness / Contrast…, and for more control, Curves… (Ctrl+M).
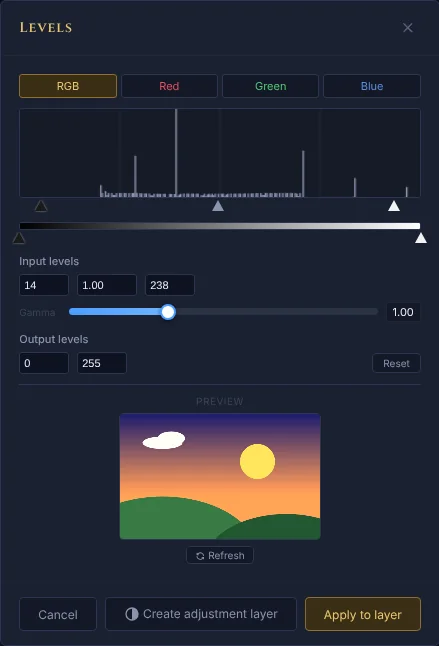
Levels: the histogram shows what is missing, and the preview shows the result. - Fix the colour with Image → Adjustments → Hue / Saturation… to make it richer or softer, or with Color balance… if the photo leans yellow or blue.
- In the Levels window, click Create adjustment layer instead of Apply to layer: the change stays on a separate layer you can hide or tweak later, without touching the photo’s pixels.
- If you need it smaller, resize it in Image → Image size…. The guide How to resize an image for social media without losing quality lists the sizes for each network.
- Export with File → Export As…: choose JPEG and a Quality of 80 to 90 for photos, or PNG if there is transparency.
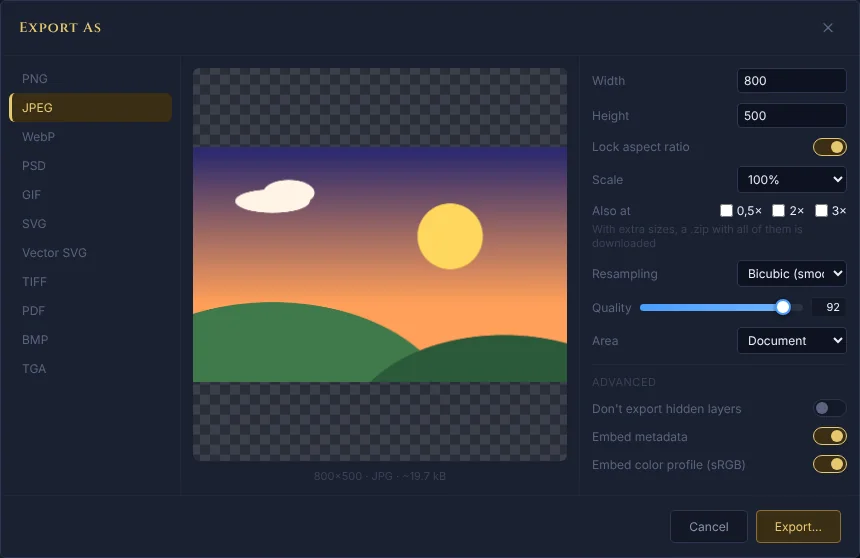
Export As: format, size and quality in one window.
Light and colour without ruining the photo
- Look at the Levels histogram: if the hill does not reach the ends, the photo lacks contrast; if it piles up against one side, it is too dark or blown out.
- Move things a little. An adjustment you notice at first glance is usually too much; compare by hiding and showing the adjustment layer with the eye in the Layers panel.
- Fix the light first and the colour second: changing the contrast also changes the colours.
Small touch-ups
- Specks and dust: the Healing brush (J key) removes them by blending with what is around.
- Distracting objects: the Clone stamp (S key) copies a clean area over them.
- Sharpness: apply Filter → Sharpen once, at the end, when the photo already has its final size.
- Background: to remove it, follow the guide How to remove the background from a photo or image for free.
Common problems
- The JPEG is too heavy. Lower the Quality to 80 or 85, or reduce the size in Image → Image size….
- Colours look different on a phone. Keep Embed color profile (sRGB) ticked when exporting.
- The transparency is gone. JPEG does not support it: export as PNG.
- You overdid an adjustment. Ctrl+Z undoes it, and the History panel takes you back to any earlier step.
Common questions
Do I need to sign up? No. You open the site and start: there is no account, no email and no watermark on what you export.
Is my photo uploaded to a server? No. The photo is opened and edited inside your browser and never leaves your device.
Can I undo a change days later? Yes, if you used adjustment layers and saved the project with File → Save. When you open it again, each adjustment is still on its own layer.
What if I want to add text on top? Follow the guide How to put text on a photo so it can be read.
More guides
- How to resize an image for social media without losing quality4 min read
- How to put text on a photo so it can be read4 min read
- How to remove the background from a photo or image for free5 min read
- How to make your first manga page in your browser6 min read
- How to make a vertical webtoon to read on a phone5 min read
- Speech balloons and speed lines for your comic5 min read
- Comic and manga page sizes: B5, A4, comic book and webtoon5 min read
- How to import your custom brushes4 min read
- How to open and save a PSD file in your browser4 min read
- How to make your first animated pixel art3 min read
- How to add subtitles to a video in your browser3 min read
- How to edit your first video in your browser4 min read
- How to make a YouTube thumbnail for free in your browser4 min read
- How to crop a photo into a circle for your profile picture4 min read
- Layer masks: what they are and how to use them4 min read
- How to make an Instagram post step by step4 min read
- How to create a sprite sheet for a video game4 min read
- How to turn an image into pixel art5 min read
- Free fonts for commercial designs: how to choose them5 min read
- How to animate a character with bones in Galion Rig4 min read
- How to convert a drawing or a logo into a vector (SVG)4 min read